OAuth 2.0
1. Create configuration file
The default data directory is
/data/mingdao/script/volume/sso/sso.json, with the following contents:
Note: If 404 still appears after mounting, you can copy the content to json.cn to verify whether the json format is legal
{
  "mode": "common-oauth2",
  "name": "oauth2",
  "oauth2": {
    "oauth2Url": "",
    "clientId": "",
    "clientSecret": "",
    "idParamName":  "client_id",
    "secretParamName": "client_secret",
    "accessTokenParamName": "access_token",
    "redirectUri": "{HAP}/orgsso/oauth2",
    "authorizePath": "/authorize",
    "tokenPath": "/access_token",
    "userInfoUrl": "",
    "params": {
      "UserId": "uid",
      "Name": "name",
      "Email": "email",
      "Mobile": "mobilePhone",
      "Positions": "positions",
      "Departments":"departments"
    },
    "autoRegister": true,
    "projectId": ""
  }
}
Some parameters and explanations
| Parameters | Type | Required | Meaning |
|---|---|---|---|
| oauth2.oauth2Url | String | Yes | oauth2 identity service address; such as http://192.168.10.80/ |
| oauth2.clientId | String | Yes | Client Id distributed to the application |
| oauth2.clientSecret | String | Yes | The client secret distributed to the application |
| oauth2.idParamName | String | Yes | The parameter name mapped by client_id, depending on the authorizePath and tokenPath interface request parameters; generally set to client_id |
| oauth2.secretParamName | String | Yes | The parameter name mapped by client_secret, depending on the authorizePath and tokenPath interface request parameters; generally set to client_secret |
| oauth2.accessTokenParamName | String | No | The parameter name of access_token mapping, depending on the parameters returned by the tokenPath interface; the default is accessToken |
| oauth2.redirectUri | String | Yes | Callback address; usually set to {HAP}/orgsso/oauth2; such as http://192.168.10.20:8880/orgsso/oauth2 |
| oauth2.authorizePath | String | Yes | authorize access path, spliced into oauth2Url/authorizePath; generally set to /authorize |
| oauth2.tokenPath | String | Yes | Get the access token interface path, spliced into oauth2Url/tokenPath; generally set to /access_token Return parameter requirements |
| oauth2.userInfoUrl | String | Yes | Obtain user information interface complete address; such as: http://{host}/getUserInfo, the final request url will automatically carry the token parameter; for example: http://192.168.10.80/getUserInfo?{tokenKeyParamName}={access_token} Return parameter requirements |
| oauth2.tokenKeyParamName | String | No | Get the parameter name of access_token passed by user information, the default is token |
| oauth2.authorizationMethod | String | No | Parameter (client_id/client_secret) value transfer method; optional parameters are [header, body]; default header |
| oauth2.bodyFormat | String | No | Parameter request format content-type is application/json or application/x-www-form-urlencoded; optional parameters are [form,json]; default form |
| oauth2.params | Object | Yes | Returns the user information field mapping rules, the key is a fixed field and the value is configured according to the actual user information; Parameter configuration method |
| oauth2.params.UserId | String | Yes | User unique identifier |
| oauth2.params.Name | String | No | User name, if the user already exists, it will be automatically overwritten |
| oauth2.params.Email | String | No | Email; this field must be set when searching or registering through email; Either email or mobile phone number must be set; if a third-party relationship has been bound, Users can be found through relationships, and the email or mobile phone does not need to be set |
| oauth2.params.Mobile | String | No | Mobile phone number; this field must be set to search or register by mobile phone number; |
| oauth2.params.Positions | Array | No | Position; automatically updates the user's position, there is no automatic creation |
| oauth2.params.Departments | Array | No | Department; automatically update the user's department, there is no automatic creation |
| autoRegister | Boolean | No | Whether to automatically create an account when the account does not exist; the default is true |
| projectId | String | Yes | HAP organization number; Organization Management (upper right corner) > Organization Information (page) > Organization Number ID; (Multi-organization single sign-on does not require configuring this parameter,See step 3 for how to configure it); such as 1x-2x-3x-4x-5x |
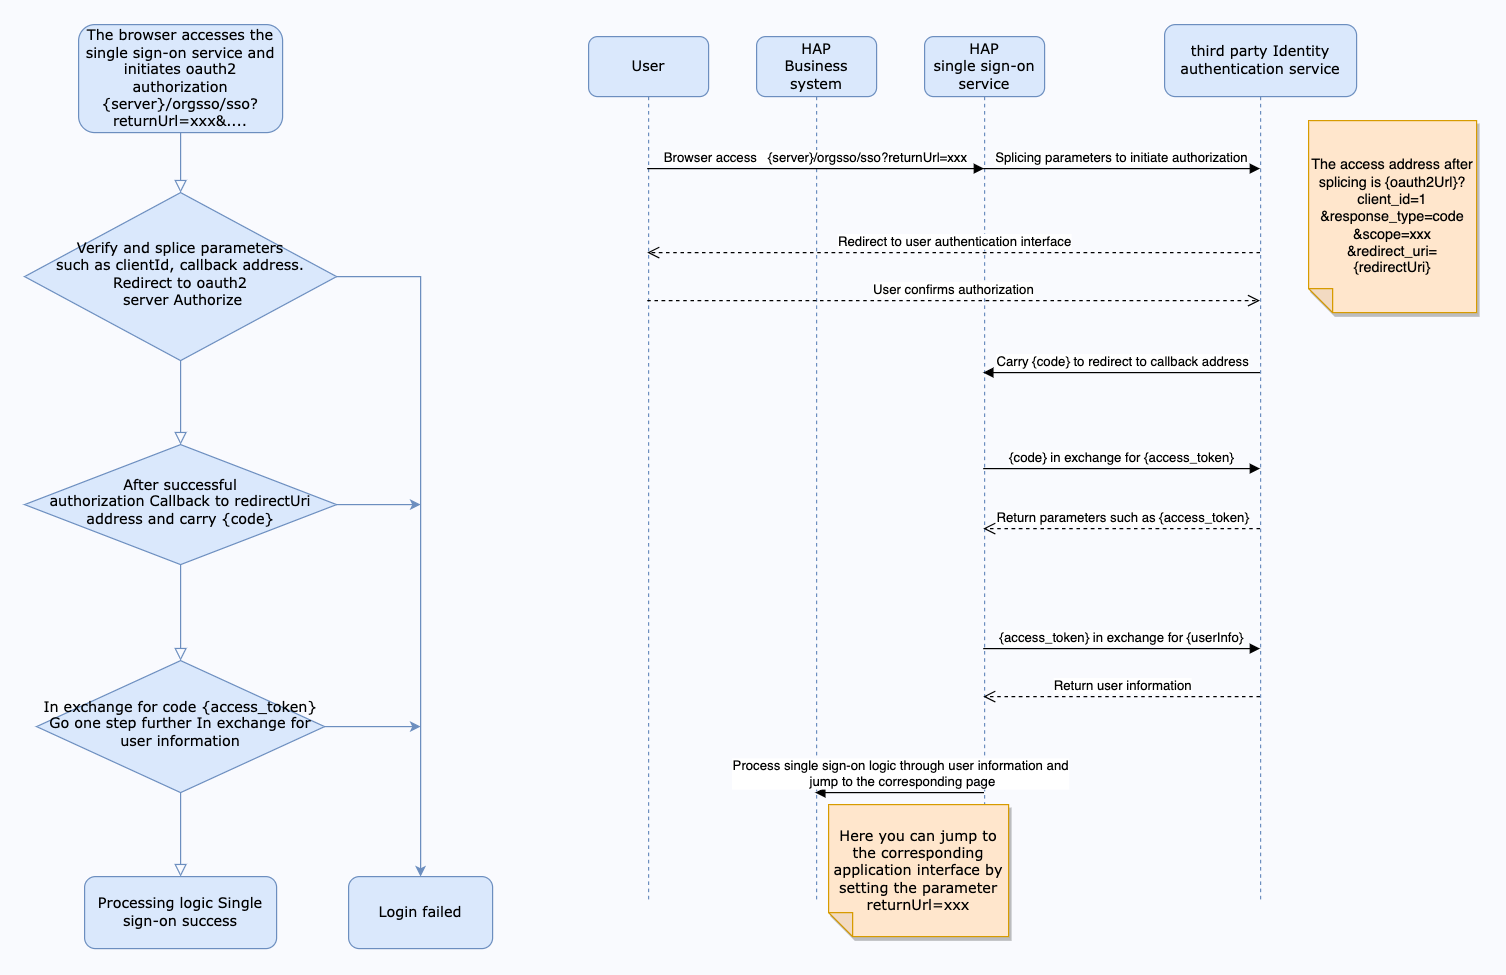
Interaction diagram
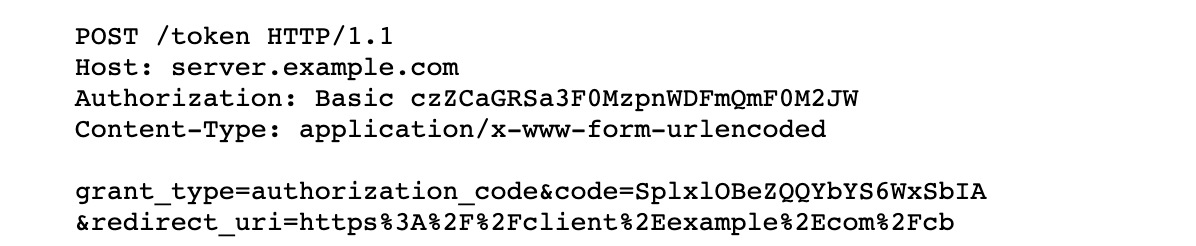
The interface for obtaining access tokens needs to meet the following requirements: -Support POST method call, as shown below:
The return value is in JSON format and must meet the following format:
{
  "access_token": "wQ7kZ5iJ1lK9iU0mJ2oH4rN0uW8gI1vV4fR1jC7yG8yX4gP2qK6mH1iS7iX4zQ1w",
  "expires_in": 7200 // unit seconds
}
The interface for obtaining user information needs to meet the following requirements: -Supports GET method calling (refer to userInfoUrl parameter description) The return value is in JSON format and must meet the following format:
{
  "data": {
    "uid": "userid",
    "name": "name",
    "email": "email",
    "mobilePhone": "mobile phone number",
    "positions":["position1","position2"],
    "departments":["department1","department2"]
  }
}
As shown in the above return value, the configuration of params is:
"params": {
  "UserId": "uid",
  "Name": "name",
  "Email": "email",
  "Mobile": "mobilePhone",
  "Positions": "positions",
  "Departments":"departments"
}
2. Mount configuration file
Modify the
docker-compose.yamlcorresponding to the microservice application, the default path is/data/mingdao/script/docker-compose.yaml, add file mounting involumesand restart the microservice application.
- ./volume/sso/sso.json:/usr/local/MDPrivateDeployment/sso/OptionFile/sso.json
Enable relationship search
If you need to bind a third-party association ID, you need to create the file
extend.json. The default path is/data/mingdao/script/volume/sso/extend.jsonand the content is as follows
{
  "relation": true
}
Add mounting files
- ./volume/sso/extend.json:/usr/local/MDPrivateDeployment/sso/extend.json
After the mounting configuration is completed, the microservice application needs to be restarted.
After the restart is successful, you can access the {HAP}/orgsso/checkssoconfig interface through GET to check whether the configuration file is successfully mounted.
3. Single sign-on
Single Organization Browser access:
{HAP}/orgsso/sso?returnUrl={returnUrl}
Multiple Organizations Browser access:
{HAP}/orgsso/sso?returnUrl={returnUrl}&appKey={appKey}&sign={sign}×tamp={timestamp}&projectId={projectId}
For multi-organization projectId needs to be passed through parameters, and enterprise authorization authentication parameters are also required;
For enterprise authentication and authorization signature algorithm, please refer to: {HAP}/apidoc/en/
{HAP} is the HAP system address, for example, it can be replaced with: http://192.168.10.20:8880
{returnUrl} is the jump address after successful login, does not need to be filled in; for example, if you need to jump to the application page, it can be replaced with: http://192.168.10.20:8880/app/cf595091-e3ac-4669 -a320-068e55533c33/64477b37df36209b5f36f1cf/64477b4f61655012a90ed994?from=insite
If an SSO Error prompt appears during the access process, you can log in to the HAP system through the administrator account, click the avatar in the upper right corner: Platform Mgt > Ops Mgt > Log; search for the service name as sso, and check the specific cause of the error.