SAML2
1. 設定ファイルの作成
デフォルトのデータディレクトリは
/data/mingdao/script/volume/sso/sso.jsonです。ファイル内容例は下記となります。
注: マウント後404が発生する場合は、内容をjson.cnにコピーし、JSON形式が正しいかご確認ください。
{
  "mode": "common-saml2",
  "name": "saml2",
  "saml2": {
    "entityId": "{HAP}/orgsso/metadata.xml",
    "assertUrl": "{HAP}/orgsso/assert",
    "params": {
      "UserId": "name_id",
      "Name": "http://schemas.xmlsoap.org/ws/2005/05/identity/claims/name",
      "Email": "http://schemas.xmlsoap.org/ws/2005/05/identity/claims/emailaddress"
    },
    "autoRegister": true,
    "projectId": ""
  }
}
パラメータと説明は以下の通りです。
| パラメータ | 型 | 必須 | 説明 |
|---|---|---|---|
| saml2.entityId | String | 必須 | SPの一意識別子。通常はSPのメタデータアドレス {HAP}/orgsso/metadata.xml。例: http://192.168.10.20:8880/orgsso/metadata.xml |
| saml2.assertUrl | String | 必須 | SPのAssertion受信アドレス。SAMLResponseを受信します。固定値 {HAP}/orgsso/assert。例: http://192.168.10.20:8880/orgsso/assert |
| saml2.params | Object | 必須 | ユーザー情報のフィールドマッピングルール。キーは固定フィールド、値は実情報に合わせて設定。パラメータ設定方法 |
| saml2.params.UserId | String | 必須 | ユーザー一意識別子 |
| saml2.params.Name | String | 必須 | ユーザー名。既存ユーザーの場合は上書き更新されます |
| saml2.params.Email | String | 任意 | メールアドレス。メールで検索や登録する際は必須。 メールまたは携帯電話番号のいずれか設定必須。サードパーティの関連付けがある場合は、メールや携帯電話登録不要です |
| saml2.params.Mobile | String | 任意 | 携帯電話番号。携帯番号で検索または登録する際は必須 |
| saml2.params.Positions | Array | 任意 | ポジション。ユーザーのポジション情報を自動更新。存在しない場合は自動作成します |
| saml2.params.Departments | Array | 任意 | 部署。ユーザーの部署情報を自動更新。存在しない場合は自動作成します |
| saml2.params.SystemLanguage | String | 任意 | ログイン後のシステム言語。zh-Hans、en、ja、zh-Hant に対応し、デフォルトは zh-Hans です |
| autoRegister | Boolean | 任意 | アカウント未登録時の自動作成可否。デフォルト値はtrue |
| projectId | String | 必須 | HAP組織番号。組織管理 (画面右上) > 組織情報ページ > 組織番号ID。( 複数組織SSOの場合、設定不要です。ステップ3参照) 例: 1x-2x-3x-4x-5x |
IDPメタデータファイル
idp.xmlを作成します。デフォルトパスは/data/mingdao/script/volume/sso/metadata/idp.xmlです。ファイル例は下記の通りです。
<EntityDescriptor entityID="https://saml2.domain.com" ID="pfxea2a0d2f-c296-4b4d-a108-53711984eee"
xmlns:md="urn:oasis:names:tc:SAML:2.0:metadata">
  <IDPSSODescriptor WantAuthnRequestsSigned="false" protocolSupportEnumeration="urn:oasis:names:tc:SAML:2.0:protocol">
    <KeyDescriptor use="signing">
      <KeyInfo
      xmlns:ds="http://www.w3.org/2000/09/xmldsig#">
        <X509Data>
          <X509Certificate>MIIDHjCCAgagAw....</X509Certificate>
        </X509Data>
      </KeyInfo>
    </KeyDescriptor>
    <SingleLogoutService Binding="urn:oasis:names:tc:SAML:2.0:bindings:HTTP-Redirect" Location="https://saml2.domain.com/65681be085c07db1c8136eee/logout"/>
    <SingleSignOnService Binding="urn:oasis:names:tc:SAML:2.0:bindings:HTTP-Redirect" Location="https://saml2.domain.com/65681be085c07db1c8136eee"/>
    <SingleSignOnService Binding="urn:oasis:names:tc:SAML:2.0:bindings:HTTP-POST" Location="https://saml2.domain.com/65681be085c07db1c8136eee"/>
  </IDPSSODescriptor>
</EntityDescriptor>
この設定は通常、IDPサービスによって自動生成されます。
インタラクション図
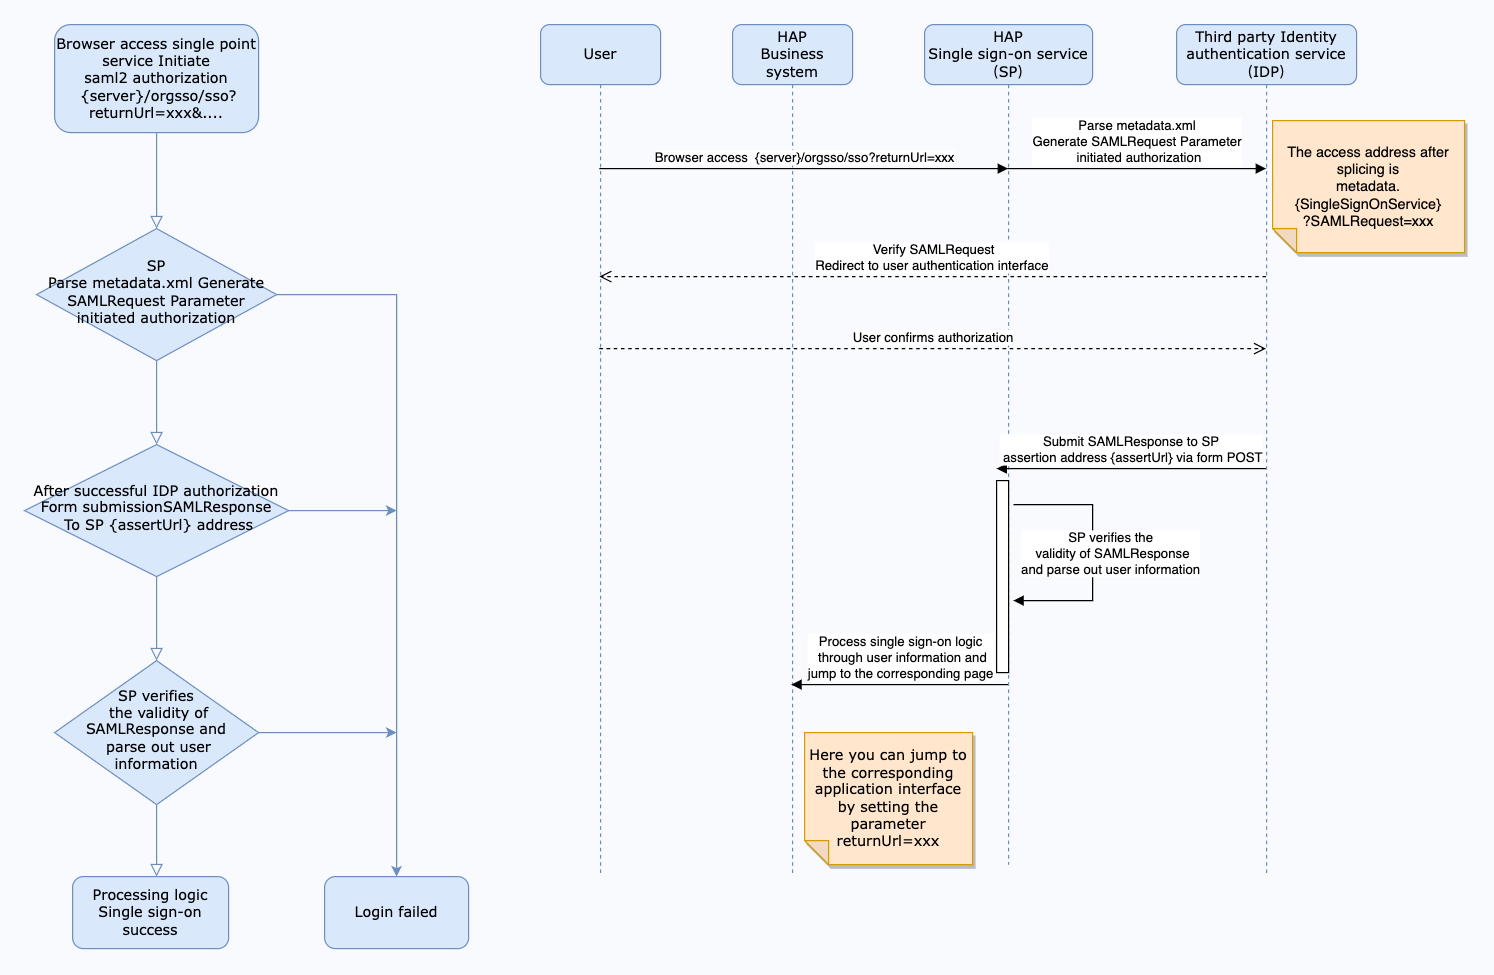
SPによるSAMLResponseの受信例
{
  "SAMLResponse": "PHNhbWxwOlJlc3BvbnNlIElEPSJwZngyNzQxM2ZiYi1mYTdmLTRjZWItYjkxY..."

}
上記はIDPがPOSTするリクエストボディのおおよその構造です。
Base64 Decode + Inflate により、ユーザー・タイムスタンプ・署名などの情報を返します。
ユーザー情報部が下記のように対応している場合、paramsの設定は以下となります。
<AttributeStatement>
  <Attribute Name="Name">
    <AttributeValue>Jack</AttributeValue>
  </Attribute>
  <Attribute Name="PrimarySid">
    <AttributeValue>1011</AttributeValue>
  </Attribute>
  <Attribute Name="EmailAddress">
    <AttributeValue>jack@domain.com</AttributeValue>
  </Attribute>

</AttributeStatement>
上記👆の戻り値に基づくparams設定例:
"params": {
  "UserId": "PrimarySid",
  "Name": "Name",
  "Email": "EmailAddress"
}
注意: Microsoft ADFS認証ソースの場合、下記属性宣言は自動でマッピング値に変換されます。
{
  "http://schemas.xmlsoap.org/ws/2005/05/identity/claims/emailaddress": "email",
  "http://schemas.xmlsoap.org/ws/2005/05/identity/claims/givenname": "given_name",
  "http://schemas.xmlsoap.org/ws/2005/05/identity/claims/name": "name",
  "http://schemas.xmlsoap.org/ws/2005/05/identity/claims/upn": "upn",
  "http://schemas.xmlsoap.org/claims/CommonName": "common_name",
  "http://schemas.xmlsoap.org/claims/Group": "group",
  "http://schemas.microsoft.com/ws/2008/06/identity/claims/role": "role",
  "http://schemas.xmlsoap.org/ws/2005/05/identity/claims/surname": "surname",
  "http://schemas.xmlsoap.org/ws/2005/05/identity/claims/privatepersonalidentifier": "ppid",
  "http://schemas.xmlsoap.org/ws/2005/05/identity/claims/nameidentifier": "name_id",
  "http://schemas.microsoft.com/ws/2008/06/identity/claims/authenticationmethod": "authentication_method",
  "http://schemas.xmlsoap.org/ws/2005/05/identity/claims/denyonlysid": "deny_only_group_sid",
  "http://schemas.microsoft.com/ws/2008/06/identity/claims/denyonlyprimarysid": "deny_only_primary_sid",
  "http://schemas.microsoft.com/ws/2008/06/identity/claims/denyonlyprimarygroupsid": "deny_only_primary_group_sid",
  "http://schemas.microsoft.com/ws/2008/06/identity/claims/groupsid": "group_sid",
  "http://schemas.microsoft.com/ws/2008/06/identity/claims/primarygroupsid": "primary_group_sid",
  "http://schemas.microsoft.com/ws/2008/06/identity/claims/primarysid": "primary_sid",
  "http://schemas.microsoft.com/ws/2008/06/identity/claims/windowsaccountname": "windows_account_name"
}
params設定例:
"params": {
  "UserId": "name_id",
  "Name": "name", // 同等設定:"http://schemas.xmlsoap.org/ws/2005/05/identity/claims/name"
  "Email": "email" // 同等設定:"http://schemas.xmlsoap.org/ws/2005/05/identity/claims/emailaddress"
}
2. 設定ファイルのマウント
該当マイクロサービスアプリケーションの
docker-compose.yaml(デフォルトは/data/mingdao/script/docker-compose.yaml) を編集し、volumesにファイルマウント設定を追加後、アプリケーションを再起動してください。
- ./volume/sso/sso.json:/usr/local/MDPrivateDeployment/sso/OptionFile/sso.json
- ./volume/sso/metadata/idp.xml:/usr/local/MDPrivateDeployment/sso/OptionFile/metadata/idp.xml
SPのmetadata.xmlは [ダウンロードアドレス:
{HAP}/orgsso/metadata.xml] で取得可能。
デフォルトは自己署名証明書です。SP署名証明書をカスタマイズする場合は、交換用の秘密鍵・証明書ファイルもマウントしてください。
- ./volume/sso/ssl/key.pem:/usr/local/MDPrivateDeployment/sso/OptionFile/ssl/key.pem # 秘密鍵交換用
- ./volume/sso/ssl/cert.crt:/usr/local/MDPrivateDeployment/sso/OptionFile/ssl/cert.crt # 証明書交換用
{HAP}/orgsso/metadata.xmlから取得可能です。
関係の検索を有効にする
外部サービスの関連 ID を紐付ける場合は、
extend.jsonを作成してください。デフォルトパスは/data/mingdao/script/volume/sso/extend.jsonです。内容は次のとおりです。
{
  "relation": true
}
ファイルのマウント設定を追加します。
- ./volume/sso/extend.json:/usr/local/MDPrivateDeployment/sso/extend.json
マウント設定後、マイクロサービスアプリケーションを再起動してください。
再起動後、GET メソッドで {HAP}/orgsso/checkssoconfig にアクセスし、設定ファイルが正常にマウントされたか確認できます。
3. シングルサインオン
単一の組織
ブラウザーで次の URL にアクセスします:{HAP}/orgsso/sso?returnUrl={returnUrl}
複数の組織
ブラウザーで次の URL にアクセスします:{HAP}/orgsso/sso?returnUrl={returnUrl}&appKey={appKey}&sign={sign}×tamp={timestamp}&projectId={projectId}
複数の組織を使用する場合は、projectId をパラメーターで渡す必要があります。企業の認証・認可パラメーターも必要です。
企業認証の署名アルゴリズムは、{HAP}/apidoc/zh-Hans/ を参照してください。
{HAP} は HAP システムの URL です。例:http://192.168.10.20:8880
{returnUrl} はログイン成功後のリダイレクト先 URL で、省略できます。アプリケーション画面に移動する場合の例:http://192.168.10.20:8880/app/cf595091-e3ac-4669-a320-068e55533c33/64477b37df36209b5f36f1cf/64477b4f61655012a90ed994?from=insite
アクセス中に SSO Error が表示された場合は、管理者アカウントで HAP にログインし、右上のアバターから「プラットフォーム管理 > 運用管理 > ログ」に進みます。サービス名が sso のログを検索して、エラーの原因を確認してください。